> ## Documentation Index
> Fetch the complete documentation index at: https://docs.brandfetch.com/llms.txt
> Use this file to discover all available pages before exploring further.
# Brandfetch MCP
> Connect Brandfetch to AI assistants
The Brandfetch MCP server exposes Brandfetch's brand data tools to any AI assistant that supports the [Model Context Protocol](https://modelcontextprotocol.io) (MCP), including Claude, Cursor, Windsurf, Gemini CLI, and others. Once configured, the assistant can search for brands, retrieve logos, brand assets, and firmographics data.
The MCP server is available at:
```
https://mcp.brandfetch.io/mcp
```
## Authentication
The Brandfetch MCP server uses OAuth. When you add the server, your MCP client opens a browser window where you sign in with your Brandfetch account. If you don't have an account yet, [sign up for free](https://developers.brandfetch.com/register); the free plan includes 100 requests per month.
If your MCP client doesn't support OAuth, or you're running in a non-interactive environment (CI, scripted agents), you can generate an MCP token in the [Keys and MCP section of the Developer Dashboard](https://developers.brandfetch.com/dashboard/keys) and send it as a bearer token:
```json theme={null}
{
"url": "https://mcp.brandfetch.io/mcp",
"headers": {
"Authorization": "Bearer YOUR_MCP_TOKEN"
}
}
```
Treat the token like a password: don't share or commit it.
## Setup
In Claude Desktop or [claude.ai](https://claude.ai), go to **Settings → Connectors → Add custom connector** and enter:
* **Name**: `Brandfetch`
* **URL**: `https://mcp.brandfetch.io/mcp`
Click **Add**, then **Connect** — a browser window opens to sign in with your Brandfetch account.
To download or embed logos and other brand assets, Claude's code execution environment needs network access to Brandfetch's CDN.
If your plan offers it, go to **Settings → Capabilities**, enable network egress for code execution, and add `*.brandfetch.io` to the domain allowlist. Availability of this setting varies by Claude plan. See [Downloading brand assets](#downloading-brand-assets) for what happens without it.
Run the following command to add the Brandfetch MCP server:
```bash theme={null}
claude mcp add brandfetch --transport http https://mcp.brandfetch.io/mcp
```
Then run `/mcp` inside Claude Code, select **brandfetch**, and follow the authentication prompt to sign in.
Use the Command Palette and look for **MCP: Add Server**, choose **HTTP**, then use the URL above.
Or create or open `.vscode/mcp.json` in your project and add:
```json theme={null}
{
"servers": {
"brandfetch": {
"type": "http",
"url": "https://mcp.brandfetch.io/mcp"
}
}
}
```
When the server starts, VS Code prompts you to sign in to Brandfetch.
Add the following to `~/.codex/config.toml` (or `.codex/config.toml` inside your project):
```toml theme={null}
[mcp_servers.brandfetch]
url = "https://mcp.brandfetch.io/mcp"
```
Or run the CLI command:
```bash theme={null}
codex mcp add brandfetch --url https://mcp.brandfetch.io/mcp
```
Then sign in with:
```bash theme={null}
codex mcp login brandfetch
```
Open **Cursor Settings → MCP** and add a new server:
```json theme={null}
{
"mcpServers": {
"brandfetch": {
"url": "https://mcp.brandfetch.io/mcp"
}
}
}
```
Click **Login** next to the server entry to sign in with your Brandfetch account.
Open your Windsurf MCP configuration file and add:
```json theme={null}
{
"mcpServers": {
"brandfetch": {
"url": "https://mcp.brandfetch.io/mcp"
}
}
}
```
Windsurf prompts you to sign in to Brandfetch when the server connects.
## The interactive brand card
On MCP Apps hosts — [claude.ai](https://claude.ai) and Claude Desktop — `get_brand` renders a full brand profile directly in the conversation. Ask about a brand and the answer arrives as an interactive card:
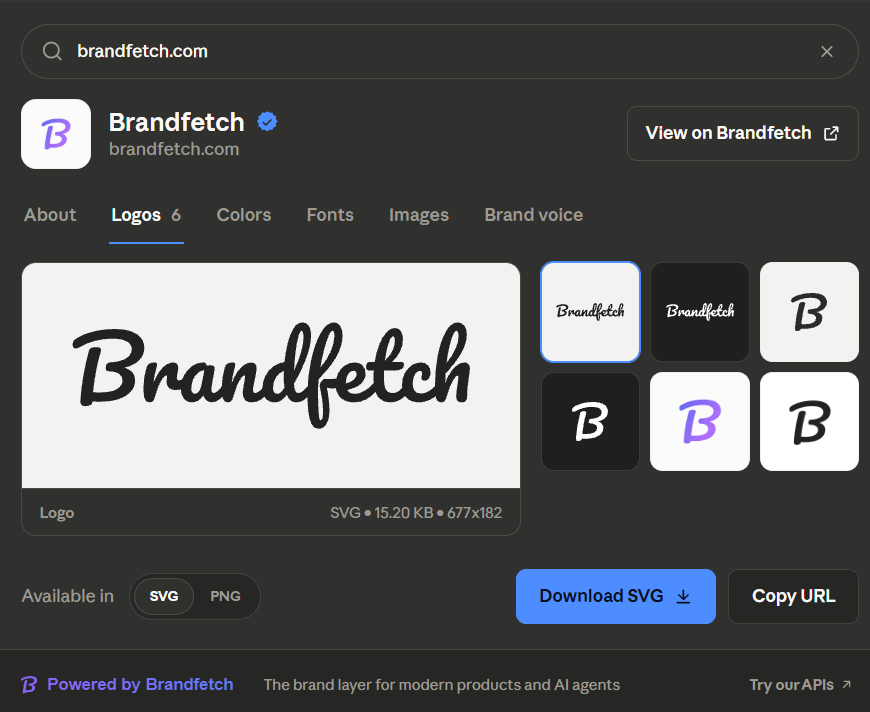 * **Six tabs.** About (description, company facts, social links), Logos, Colors, Fonts, Images, and Brand voice — the same profile the [Developer Playground](https://brandfetch.com/developers/playground) shows, adapted to chat.
* **Assets you can use immediately.** Pick any logo variant, switch between its available formats, and download the file or copy a ready-to-use URL. Each asset shows its format, file size, and dimensions. Downloads from the card are handed straight to Claude — no network allowlist required.
* **Search without leaving the card.** Look up another brand from inside the card; the conversation follows, so "add that logo to the deck" always means the brand on screen.
* **Opens on the right tab.** Ask for a specific aspect — "Okta's brand voice", "Nike's colors" — and the card opens directly on that tab.
* **Native to Claude.** The card follows Claude's light and dark themes and typography, so it reads as part of the conversation.
Text-only MCP clients are unaffected: `get_brand` returns the same brand data everywhere, and the card is a layer on top for hosts that support it. Already-connected clients pick up new capabilities after removing and re-adding the connector, since hosts cache a server's tool list.
## Available tools
| Tool | Description |
| - | - |
| `brand_search` | Search for brands by name. Useful when the domain is unknown or ambiguous. |
| `get_brand` | Retrieve full brand data (logos, colors, fonts, company info) by domain, website URL, email address, ticker, ISIN, or crypto symbol. On MCP Apps hosts it renders the [interactive brand card](#the-interactive-brand-card); an optional `view` argument opens the card on a specific tab. |
| `get_brand_data` | The same brand data as `get_brand`, returned without the interactive card. Use it when the data feeds a task — several brands at once (logo walls, comparison tables), generated content, or programmatic processing. |
| `get_brand_context` | Get LLM-ready brand context for a domain, website URL, or email address: voice, audience, positioning, and style. Use when generating content or reasoning about brand fit. |
| `enrich_transaction` | Identify a merchant brand from a raw credit card or bank statement string. |
| `build_logo_urls` | Construct Brandfetch CDN logo URLs for one or more brands without making an API call. |
| `send_feedback` | Send feedback about the MCP server (bugs, data quality, feature requests) to the Brandfetch team. |
## Downloading brand assets
Downloading an asset for yourself is built into the [interactive brand card](#the-interactive-brand-card): the Download button hands the file straight to Claude, with no network configuration needed.
When your assistant needs actual image bytes — embedding a logo in a generated document (PPTX, DOCX, PDF), saving files to disk, or processing pixels — the reliable path is to fetch the credentialed `src` URLs returned by `get_brand` directly from its code-execution environment (curl, requests, fetch). That keeps image bytes out of the conversation entirely.
**Using Claude? Allowlist `cdn.brandfetch.io` first.**
On [claude.ai](https://claude.ai) (web, desktop, and mobile apps) sandboxed code execution can only reach domains permitted by your network-egress settings. By default the Brandfetch CDN is blocked, so downloading logos, icons, and other assets is not possible.
To enable direct downloads, go to **Settings → Capabilities**, enable network egress for code execution, and add `*.brandfetch.io` to the domain allowlist. On Pro and Max plans you can do this yourself; on Team and Enterprise plans the setting is org-level, so ask an Owner or Admin. We strongly recommend this for any workflow that downloads or embeds brand assets.
Note that URLs from `build_logo_urls` are display-only under the hotlinking policy and can't be downloaded programmatically — always use the `src` URLs from `get_brand`, whose `?c=` token carries per-request credentials.
If a generated document only needs to display a logo, it doesn't need the bytes at all: reference the credentialed `src` URL directly (a linked image in PPTX, an `
* **Six tabs.** About (description, company facts, social links), Logos, Colors, Fonts, Images, and Brand voice — the same profile the [Developer Playground](https://brandfetch.com/developers/playground) shows, adapted to chat.
* **Assets you can use immediately.** Pick any logo variant, switch between its available formats, and download the file or copy a ready-to-use URL. Each asset shows its format, file size, and dimensions. Downloads from the card are handed straight to Claude — no network allowlist required.
* **Search without leaving the card.** Look up another brand from inside the card; the conversation follows, so "add that logo to the deck" always means the brand on screen.
* **Opens on the right tab.** Ask for a specific aspect — "Okta's brand voice", "Nike's colors" — and the card opens directly on that tab.
* **Native to Claude.** The card follows Claude's light and dark themes and typography, so it reads as part of the conversation.
Text-only MCP clients are unaffected: `get_brand` returns the same brand data everywhere, and the card is a layer on top for hosts that support it. Already-connected clients pick up new capabilities after removing and re-adding the connector, since hosts cache a server's tool list.
## Available tools
| Tool | Description |
| - | - |
| `brand_search` | Search for brands by name. Useful when the domain is unknown or ambiguous. |
| `get_brand` | Retrieve full brand data (logos, colors, fonts, company info) by domain, website URL, email address, ticker, ISIN, or crypto symbol. On MCP Apps hosts it renders the [interactive brand card](#the-interactive-brand-card); an optional `view` argument opens the card on a specific tab. |
| `get_brand_data` | The same brand data as `get_brand`, returned without the interactive card. Use it when the data feeds a task — several brands at once (logo walls, comparison tables), generated content, or programmatic processing. |
| `get_brand_context` | Get LLM-ready brand context for a domain, website URL, or email address: voice, audience, positioning, and style. Use when generating content or reasoning about brand fit. |
| `enrich_transaction` | Identify a merchant brand from a raw credit card or bank statement string. |
| `build_logo_urls` | Construct Brandfetch CDN logo URLs for one or more brands without making an API call. |
| `send_feedback` | Send feedback about the MCP server (bugs, data quality, feature requests) to the Brandfetch team. |
## Downloading brand assets
Downloading an asset for yourself is built into the [interactive brand card](#the-interactive-brand-card): the Download button hands the file straight to Claude, with no network configuration needed.
When your assistant needs actual image bytes — embedding a logo in a generated document (PPTX, DOCX, PDF), saving files to disk, or processing pixels — the reliable path is to fetch the credentialed `src` URLs returned by `get_brand` directly from its code-execution environment (curl, requests, fetch). That keeps image bytes out of the conversation entirely.
**Using Claude? Allowlist `cdn.brandfetch.io` first.**
On [claude.ai](https://claude.ai) (web, desktop, and mobile apps) sandboxed code execution can only reach domains permitted by your network-egress settings. By default the Brandfetch CDN is blocked, so downloading logos, icons, and other assets is not possible.
To enable direct downloads, go to **Settings → Capabilities**, enable network egress for code execution, and add `*.brandfetch.io` to the domain allowlist. On Pro and Max plans you can do this yourself; on Team and Enterprise plans the setting is org-level, so ask an Owner or Admin. We strongly recommend this for any workflow that downloads or embeds brand assets.
Note that URLs from `build_logo_urls` are display-only under the hotlinking policy and can't be downloaded programmatically — always use the `src` URLs from `get_brand`, whose `?c=` token carries per-request credentials.
If a generated document only needs to display a logo, it doesn't need the bytes at all: reference the credentialed `src` URL directly (a linked image in PPTX, an `![]() ` tag in HTML) and let the viewer fetch it. Clients that support MCP resource reads can also stream asset bytes out-of-band via the `bf://asset/{domain}/{type}` resource links returned by `get_brand`.
## Usage and quotas
MCP requests count against your Brand API quotas. You can monitor your usage in the [Developer Dashboard](https://developers.brandfetch.com).
This documentation is built and hosted on [Mintlify](https://mintlify.com), a developer documentation platform.
` tag in HTML) and let the viewer fetch it. Clients that support MCP resource reads can also stream asset bytes out-of-band via the `bf://asset/{domain}/{type}` resource links returned by `get_brand`.
## Usage and quotas
MCP requests count against your Brand API quotas. You can monitor your usage in the [Developer Dashboard](https://developers.brandfetch.com).
This documentation is built and hosted on [Mintlify](https://mintlify.com), a developer documentation platform.